Menu QR codes are widely used in restaurants to replace or support physical menus. Instead of handing out printed menus or paper menus, restaurants allow guests to access a digital version of the menu directly on their own device.
Understanding how menu QR codes work inside QRCodeKIT is important because this QR code type is not just a link. It creates a structured menu page that can be updated over time without changing the printed QR code. That makes it especially useful for restaurants that need flexibility, frequent menu updates, or multilingual menus.
In this guide, we explain how menu QR codes work specifically in QRCodeKIT, step by step, based on the actual interface and options you see in the product.
What this QR code does in QRCodeKIT
In QRCodeKIT, a menu QR code creates a dedicated menu page designed for restaurants. When customers scan the QR code with their smartphone camera, the QR opens a web page that displays the restaurant’s menu content in a mobile-friendly layout.
This page can include:
- Menu PDFs or images
- Buttons linking to different menu versions (for example, languages)
- Text sections for descriptions or announcements
- Contact actions such as phone or WhatsApp
- Social media links and address information
The QR code itself is dynamic. That means the same QR code can stay printed on tables or table tents while the menu content behind it is updated.
How it works step by step in QRCodeKIT
Step 1: Create a new QR code
From the QRCodeKIT dashboard, you start by clicking Create QR. This opens the QR code type selection screen, where all available QR types are listed.
At this point, you are choosing what kind of experience the QR code will open on the customer’s phone.

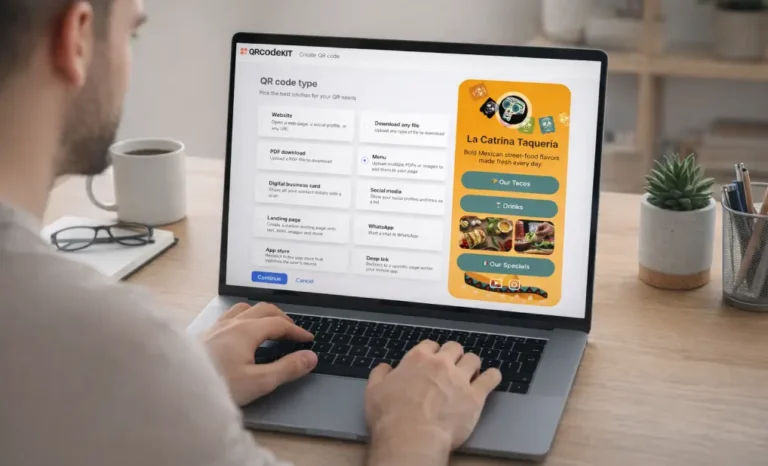
Step 2: Select the menu QR code type
In the QR code type list, you select Menu. The interface clearly indicates that this option allows you to upload multiple PDFs or images and add them to your page.
Once selected, you continue to the menu editor. This step defines the QR as a menu QR code for restaurants, not a generic website QR.

Step 3: Build the menu page content
Inside the menu editor, you add the content that customers will see after scanning.
Based on the available blocks shown in the interface, you can:
- Upload images, such as a logo
- Add text for the restaurant name and description
- Add file buttons that link to menu PDFs (for example, “Menu English” or “Menu Italiano”)
- Include phone buttons so customers can call directly
- Add WhatsApp, social media, email, or address blocks
Each element appears as a block in the editor and can be reordered or removed. The preview on the right shows exactly how the menu page will look on a customer’s phone.

Step 4: Choose the page style
After adding the content, you can adjust the page style. QRCodeKIT lets you select from predefined themes or apply custom styles.
From the page style section shown in the UI, you can:
- Choose a theme layout
- Set a background (flat color, gradient, or image)
- Adjust button styles such as color and border radius
These settings affect the menu page only. They do not change how the QR code itself scans.

Step 5: Save and name the QR code
Once the menu page is ready, you save the QR code and give it a name. This name is used internally in your dashboard to identify the QR code, especially if you manage multiple menus.
After saving, the QR code appears in your QR list with its visit count, short link, and status.
Step 6: Customize and download the QR code
From the QR design screen, you can customize the visual appearance of the QR code itself. The interface shows available QR frames, optional logos, and design presets.
The QR remains readable under ISO/IEC 18004 standards, and once ready, it can be downloaded as an image file for printing. This is the version used on table tents, stands, or printed materials in the dining room.

Why this approach works well for real use cases
For many restaurants, this setup solves several practical problems at once. Printing costs are reduced because menus no longer need to be reprinted every time menu items change. Updates can be made directly in the menu page without replacing the QR code.
It also improves the dining experience for multiple guests. Everyone at the table can scan the same QR code on their own phone, browse the menu at their own pace, and avoid physical contact with shared menus.
From an operational point of view, restaurants operate more efficiently. Menu updates are faster, staff spend less time explaining changes, and the ordering process becomes clearer for customers.
Common mistakes or misunderstandings
A common misunderstanding is expecting the menu QR code to automatically handle ordering or payments. In QRCodeKIT, the menu QR code focuses on presenting menu content. Ordering systems or contactless payments depend on what is linked or integrated through the menu page content.
Another frequent mistake is creating a new QR code every time the menu changes. Because the QR code is dynamic, menu updates should be made on the page itself, not by replacing the QR code.
Some restaurant owners also assume customers need a special app. In practice, customers simply scan using their smartphone camera, and the menu opens as a standard web page.
Understanding menu QR codes in QRCodeKIT
Menu QR codes in QRCodeKIT are designed to give restaurants a flexible, low-friction way to share menus digitally. Customers scan once and access the menu on their own device, while restaurants keep control over updates, design, and structure.
If you’re exploring how different QR code types work inside QRCodeKIT, menu QR codes are a practical example of how digital menus can replace traditional paper menus without complicating restaurant operations.